一、什麼是 class component?
React 16.8 之前都是以 class component 的寫法,因為以前的 function component 沒有 state、hook 的概念,16.8 基本上都完全使用 Function component
- 用 Function 寫 component 叫做 function component。
- 用 class 寫 component 叫做 class component。需要有較多背景知識:包含 es6 class、this
// Function component
function Button({onClick, children}) {
  return <button onClick={onClick}>{children}</button>
}
Class component 最陽春的寫法:只有 render
// Class component
import React, {useState, useRef, useEffect, useLayoutEffect, memo, useCallback, useMemo} from 'react'

class Button extends React.Component {
  // 有一個 method 叫做 render
  render() {
    // 這邊可以拿到 this.props
    const {onClick, children} = this.props
    return <button onClick={onClick}>{children}</button>
  }
}
ex:將 Function component 改成 Class component
Function component 寫法會有兩個 handler,按下按鈕會 call handleToggleClick、handleDeleteClick
import './App.css';
import styled from 'styled-components'
import React from 'react'
import {MEDIA_QUERY_MD, MEDIA_QUERY_LG} from './constants/style'
const TodoItemWrapper = styled.div`
  border: 1px solid gray;
  display: flex;
  align-items: center;
  justify-content: space-between;
  padding: 8px 16px;
`
const TodoContent = styled.div`
  color: ${props => props.theme.colors.red_300};
  font-size: 24px;
  ${props => props.size === 'XL' && `font-size: 20px;`};
  ${props => props.$isDone && `text-decoration: line-through`}
`
const TodoButtonWrapper = styled.div``
const Button = styled.button`
  padding: 4px;
  color: black;
  & + & {
    margin-left: 6px;
  }
  &: hover {
    color: red;
  }
  ${MEDIA_QUERY_MD} {
    font-size: 16px;
  }
  ${MEDIA_QUERY_LG} {
    color: blue;
  }
`
const GreenButton = styled(Button)`
  color: green;
`

function TodoItem ({className, size, todo, handleDeleteTodo, hadnleToggleIsDone}) {
  const handleToggleClick = () => {
    hadnleToggleIsDone(todo.id)
  }
  const handleDeleteClick = () => {
    handleDeleteTodo(todo.id)
  }
  return (
    <div className="App">
      <TodoItemWrapper className={className} data-todo-id={todo.id}>
        <TodoContent $isDone={todo.isDone} size={size}>{todo.content}</TodoContent>
        <TodoButtonWrapper>
          <Button onClick={handleToggleClick}>
            {todo.isDone && '未完成'}
            {!todo.isDone && '已完成'}
          </Button>
          <GreenButton onClick= {handleDeleteClick}>刪除</GreenButton>
        </TodoButtonWrapper>
      </TodoItemWrapper>
    </div>
  )
}

export default TodoItem;
還少了 handleToggleClick、handleDeleteClick,可以用 inline function 的寫法或是用下面的寫法
export default class TodoItemC extends React.Component {
  handleToggleClick () {
    const {hadnleToggleIsDone, todo} = this.props
    hadnleToggleIsDone(todo.id)
  }
  handleDeleteClick () {
    const {handleDeleteTodo, todo} = this.props
    handleDeleteTodo(todo.id)
  }
  // render 這個 method 一樣 renturn 我要的東西
  render() {
    const {className, size, todo} = this.props // 用 this.props 將要的東西拿出來
    return (
      <div className="App">
        <TodoItemWrapper className={className} data-todo-id={todo.id}>
          <TodoContent $isDone={todo.isDone} size={size}>{todo.content}</TodoContent>
          <TodoButtonWrapper>
            <Button onClick={this.handleToggleClick}>
              {todo.isDone && '未完成'}
              {!todo.isDone && '已完成'}
            </Button>
            <GreenButton onClick= {this.handleDeleteClick}>刪除</GreenButton>
          </TodoButtonWrapper>
        </TodoItemWrapper>
      </div>
    )
  }
}
按刪除、以完成噴錯:TypeError: Cannot read property 'props' of undefined,表示 this 是 undefined,undefined 上面沒有 props 這個 property。
why ?
render Button onClick 傳進一個 function ie {this.handleToggleClick}。因為 this 的值取決於怎麼 call function,Button 現在的寫法是直接 call onClick,所以他會去 call this.props 的 onClick,這時 onClick function 裡面拿到的會是嚴格模式下預設的 this undefined。
class Button extends React.Component {
  // 有一個 method 叫做 render
  render() {
    // 這邊可以拿到 this.props
    const {onClick, children} = this.props
    return <button onClick={onClick}>{children}</button>
  }
}
// this 的值與你怎麼呼叫他決定
onClick()  // onClick 裡面的 this 是 undefined
this.props.onClick() // onClick 裡面的 this 是 this.props
a.b.onClick() // onClick 裡面的 this 是 a.b
解決方法一、透過 class 裡面的 constructor
- 物件導向的緣故所以要先 super(props),讓 React.Component 也吃到 props 幫我去做 class 的初始化
- 利用 bind 的方式讓 handleToggleClick 被呼叫 this 都會是現在 constructor 裡面的 this,就等於是 TodoItemC 這個 component
export default class TodoItemC extends React.Component {
  constructor(props) {
    super(props)
    this.handleToggleClick = this.handleToggleClick.bind(this)
    this.handleDeleteClick = this.handleDeleteClick.bind(this)
  }
解決方法二、改成類似箭頭函式的東西
這樣的寫法,this 會預設為 TodoItemC 這個 component。用這個寫法都會自動幫你 bind this。
export default class TodoItemC extends React.Component {
  handleToggleClick = () => {
    const {hadnleToggleIsDone, todo} = this.props
    hadnleToggleIsDone(todo.id)
  }
  handleDeleteClick = () => {
    const {handleDeleteTodo, todo} = this.props
    handleDeleteTodo(todo.id)
  }
如果內部要 state 的話 ...
export default class TodoItemC extends React.Component {
  constructor(props) {
    super(props)
    this.state = {
      counter: 1
    }
  }
  handleToggleClick = () => {
    const {hadnleToggleIsDone, todo} = this.props
    hadnleToggleIsDone(todo.id)
    this.setState({
      counter: this.state.counter + 1
    })
  }
代碼長相
import './App.css';
import styled from 'styled-components'
import React from 'react'
import {MEDIA_QUERY_MD, MEDIA_QUERY_LG} from './constants/style'
const TodoItemWrapper = styled.div`
  border: 1px solid gray;
  display: flex;
  align-items: center;
  justify-content: space-between;
  padding: 8px 16px;
`
const TodoContent = styled.div`
  color: ${props => props.theme.colors.red_300};
  font-size: 24px;
  ${props => props.size === 'XL' && `font-size: 20px;`};
  ${props => props.$isDone && `text-decoration: line-through`}
`
const TodoButtonWrapper = styled.div``
const Button = styled.button`
  padding: 4px;
  color: black;
  & + & {
    margin-left: 6px;
  }
  &: hover {
    color: red;
  }
  ${MEDIA_QUERY_MD} {
    font-size: 16px;
  }
  ${MEDIA_QUERY_LG} {
    color: blue;
  }
`
const GreenButton = styled(Button)`
  color: green;
`
export default class TodoItemC extends React.Component {
  constructor(props) {
    super(props)
    this.state = {
      counter: 1
    }
  }
  handleToggleClick = () => {
    const {hadnleToggleIsDone, todo} = this.props
    hadnleToggleIsDone(todo.id)
    this.setState({
      counter: this.state.counter + 1
    })
  }
  handleDeleteClick = () => {
    const {handleDeleteTodo, todo} = this.props
    handleDeleteTodo(todo.id)
  }
  // render 這個 method 一樣 renturn 我要的東西
  render() {
    const {className, size, todo} = this.props // 用 this.props 將要的東西拿出來
    return (
      <div className="App">
        <TodoItemWrapper className={className} data-todo-id={todo.id}>
          <TodoContent $isDone={todo.isDone} size={size}>{todo.content}</TodoContent>
          <TodoButtonWrapper>
            <Button onClick={this.handleToggleClick}>
              {todo.isDone && '未完成'}
              {!todo.isDone && '已完成'}
            </Button>
            <GreenButton onClick= {this.handleDeleteClick}>刪除</GreenButton>
          </TodoButtonWrapper>
        </TodoItemWrapper>
      </div>
    )
  }
}
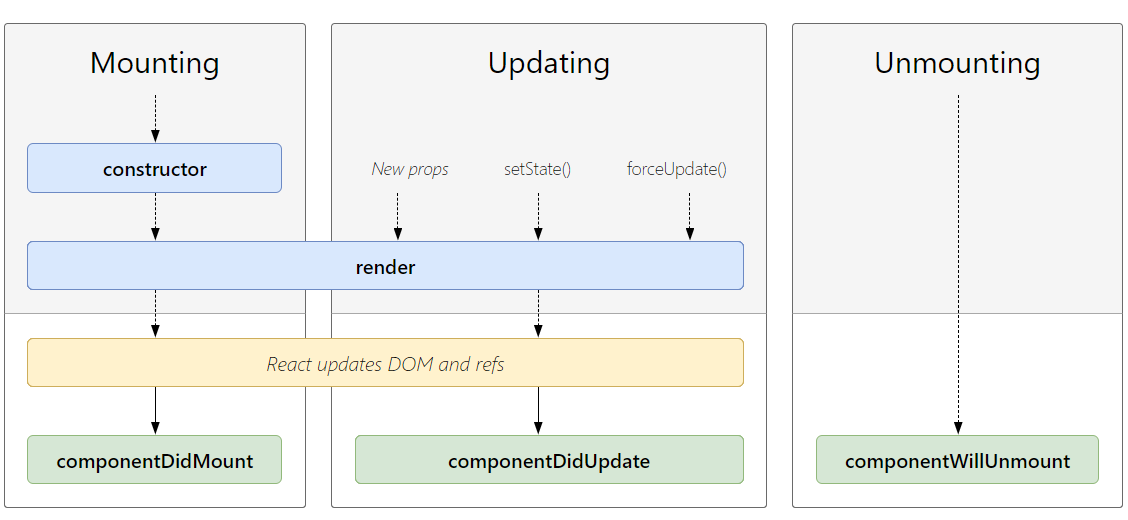
二、Class component 的生命週期
Hooks 的 hooks flow 分為 mount, update, unmount,不管哪個幾乎都是用 useEffect 進行處理。
ex 寫一個 counter 的 app,在每個地方加 log 最容易看出生命週期
唯一可以指定 state 的地方只能在 constructor,其他地方要用 this.setState 改變他的值。
他有幾個生命週期,一樣是透過 class 來做的。
componentDidMount 是 react 內建的 method,所以呼叫他時可以保證裡面可以拿到 react 內建的值,不用再使用箭頭函式。
componentWillUnmount 是 component unmount 之前,將 component 從畫面上去除,當你不 render 他時。
componentDidUpdate 是 component update 之後,他會給你前一次的 props 跟前一次的 state。
透過這樣的寫法去監聽他的生命週期
import React from 'react'

export default class Counter extends React.Component {
  constructor(props) {
    super(props)
    this.state = {
      counter: 1
    }
    console.log('constructor')
  }
  // component mount 的時候就會執行
  componentDidMount() {
    console.log('did mount', this.state)
  }
  // component update 之後
  componentDidUpdate(prevProps, prevState) {
    console.log('prevState:', prevState)
    console.log('update!!')
  }
  // component unmount 之前
  componentWillUnmount() {
    console.log('unmount')
  }
  handleClick = () => {
    this.setState({
      counter: this.state.counter + 1
    })
  }
  render() {
    const {counter} = this.state
    console.log('render')
    return (
      <div>
        <button onClick={this.handleClick}>+1</button>
        counter: {counter}
      </div>
    )
  }
}
只要 props 跟 state 一變,就會 update。(re-render 議題)
如果有參數,會再更新前去 call,如果參數裡面回傳的是 false 他就不會 update,若回傳的是 true 就會 update。
  shouldComponentUpdate() {
    return false
  }
  // 畫面永遠不會有反應,因為永遠不會更新
可以透過這兩個參數決定要否更新,這邊通常不會像是下面這樣寫法。通常會用 memo,比對每一個 props 是否一樣,如果每一個 props 一樣就不需要 update,如果有 props 改變就要改變。所以可以自訂要怎麼比較。
  shouldComponentUpdate(nextProps, nextState) {
    if (nextState.counter > 5) return false
    return true
  }
React.PureComponent 和 memo 是同樣的東西,使用 PureComponent react 會自動幫你做優化,他會自動幫你寫 shouldComponentUpdate 的方法。會自動設定成 props 裡面屬性有變動才會自動 update,如果沒有的話就不 re-render。
小結
- class 為 base、function 為 base
- class 每次 render 都會執行 render() 這個 function 而已,每個都有對應的 life-cycle 就寫在裡面;function component 是甚麼東西都寫在 function 裡面,每次 re-render 就直接執行整個 function,等於說他自己本身就是 render function 的說
- 生命週期:class-(在 life-cycle 要做甚麼);function-用 useEffect (component render 完要做甚麼,只剩 render 這個東西,render 完要做甚麼)
- 有些 life cycle 用 hook 是做不太到的,或是要做很麻煩。(edge case)
進入 hook 要關注的點,不是某個 life cycle 要做甚麼,而是當我的 function 重新 render 我要做甚麼。當 function render 完,某個 props 改變我要做甚麼事情。
三、prop drilling 介紹
中間隔了很多層 component
import React from 'react';
import {useState, useEffect, useRef, useCallback} from 'react'
function DemoInnerBoxContent() {
  return (
    <div>
      <button>update title!!</button>
    </div>
  )
}

function DemoInnerBox() {
  return <DemoInnerBoxContent/>
}

function DemoInner() {
  return <DemoInnerBox/>
}

export default function Demo() {
  const [title, setTitle] = useState('I am title !')
  return (
    <div>
      title: {title}
      <DemoInner/>
    </div>
  )
}
真實的 App 還真的會出現這麼多 component,上述只是簡化後的結果。
想要按按鈕,更新 title。要在 children update parent 的 state,要把 children 的 setter function 傳下去,相對應的 component 就會接收傳下去的 setter function。
在經歷無數中間層後,最後才會在 parent 拿到這個 function 並進行呼叫的動作。
import React from 'react';
import {useState, useEffect, useRef, useCallback} from 'react'
function DemoInnerBoxContent({setTitle}) {
  return (
    <div>
      <button  onClick={() => {setTitle(Math.random())}}>update title!!</button>
    </div>
  )
}

function DemoInnerBox({setTitle}) {
  return <DemoInnerBoxContent setTitle={setTitle}/>
}

function DemoInner({setTitle}) {
  return <DemoInnerBox setTitle={setTitle}/>
}

export default function Demo() {
  const [title, setTitle] = useState('I am title !')
  return (
    <div>
      title: {title}
      <DemoInner setTitle={setTitle}/>
    </div>
  )
}
如果 component 更深,五層、十五層,是要每一層都傳嗎 ? 如果要傳的不只是一個 function,是要每一層都傳嗎 ? 這個問題就是 prop drilling
有沒有辦法從 children 傳遞到任一層呢 ? 這就是 context 要解決的問題。
四、useContext 簡介
react 上層跟下層溝通,可能要傳遞資料給下層的東西,然後下面的東西才能去用他。比方說上面的範例,將 setTitle 這個 function 傳給 DemoInner,DemoInner 裡面再傳 DemoInnerBox,DemoInnerBox 裡面再傳給 DemoInnerBoxContent,在 DemoInnerBoxContent 這層裡面才能用到 setTitle
// props 傳遞的中間層
function DemoInnerBox({setTitle}) {
  return <DemoInnerBoxContent setTitle={setTitle}/>
}

function DemoInner({setTitle}) {
  return <DemoInnerBox setTitle={setTitle}/>
}
層級一多就很容易造成錯誤,react 裡面提供了 useContext 的方法。
首先 import 兩個東西 useContext, createContext
import {useState, useContext, createContext} from 'react'
react 裡面 Context 類似脈絡,可以透過上層的東西傳到下面。在要傳遞資料的地方透過 component 包住。我這個 component 是要提供提供這個值的人,對於 context 來說我是要提供這個值的人,value 放我要傳下去的東西。
在 TitleContext 一層將 setTitle 給傳下去,在底下任何一層都可以使用這個 context。
透過 context 的方法,就可以讓中間層不用扮演傳遞資訊的角色。
import React from 'react';
import {useState, useContext, createContext} from 'react'

const TitleContext = createContext() // 裡面傳的是 TitleContext 要提供 value 的初始值

function DemoInnerBoxContent() {
  const setTitle = useContext(TitleContext) // 我在這一層要用 context 傳進來的值
  return (
    <div>
      <button  onClick={() => {setTitle(Math.random())}}>update title!!</button>
    </div>
  )
}

function DemoInnerBox() {
  return <DemoInnerBoxContent/>
}

function DemoInner() {
  return <DemoInnerBox/>
}

export default function Demo() {
  const [title, setTitle] = useState('I am title !')
  return (
    <TitleContext.Provider value={setTitle}>
    <div>
      title: {title}
      <DemoInner/>
    </div>
    </TitleContext.Provider>
  )
}
總結
- 傳資料的地方用 Context.Provider 將東西包起來,要用的地方用 useContext 他就可以用我傳進來的值
<TitleContext.Provider value={setTitle}>value 可以傳任何東西,現在是傳一個值,當然我也可以傳陣列,value 傳甚麼 useContext 回傳就是甚麼
import React from 'react';
import {useState, useContext, createContext} from 'react'

const TitleContext = createContext() // 裡面傳的是 TitleContext 要提供 value 的初始值

function DemoInnerBoxContent() {
  const [title, setTitle] = useContext(TitleContext) // 我在這一層要用 context 傳進來的值
  return (
    <div>
      <button  onClick={() => {setTitle(Math.random())}}>update title!!</button>
      {title}
    </div>
  )
}

function DemoInnerBox() {
  return <DemoInnerBoxContent/>
}

function DemoInner() {
  return <DemoInnerBox/>
}

export default function Demo() {
  const [title, setTitle] = useState('I am title !')
  return (
    <TitleContext.Provider value={[title, setTitle]}>
    <div>
      title: {title}
      <DemoInner/>
    </div>
    </TitleContext.Provider>
  )
}
ThemeProvider 背後也是用 Context.Provider 實做。
import React from 'react';
import {useState, useContext, createContext} from 'react'

const TitleContext = createContext() // 裡面傳的是 TitleContext 要提供 value 的初始值
const ColorContext = createContext()
function DemoInnerBoxContent() {
  const [title, setTitle] = useContext(TitleContext) // 我在這一層要用 context 傳進來的值
  const colors = useContext(ColorContext)
  return (
    <div>
      <button  style={{color: colors.primary}} onClick={() => {setTitle(Math.random())}}>
        update title!!
      </button>
      {title}
    </div>
  )
}

function DemoInnerBox() {
  return <DemoInnerBoxContent/>
}

function DemoInner() {
  return <DemoInnerBox/>
}

export default function Demo() {
  const [title, setTitle] = useState('I am title !')
  return (
    <ColorContext.Provider value={{
      primary: 'red'
    }}>
    <TitleContext.Provider value={[title, setTitle]}>
    <div>
      title: {title}
      <DemoInner/>
    </div>
    </TitleContext.Provider>
    </ColorContext.Provider>
  )
}
可以動態換 Provider 裡面提供的 value,就可以達成 dark theme 的作法。context 的東西是可以變換的。
import React from 'react';
import {useState, useContext, createContext} from 'react'

const TitleContext = createContext() // 裡面傳的是 TitleContext 要提供 value 的初始值
const ColorContext = createContext()
function DemoInnerBoxContent() {
  const [title, setTitle] = useContext(TitleContext) // 我在這一層要用 context 傳進來的值

  const colors = useContext(ColorContext)
  return (
    <div>
      <button  style={{color: colors.primary}} onClick={() => {setTitle(Math.random())}}>
        update title!!
      </button>
      {title}
    </div>
  )
}

function DemoInnerBox() {
  return <DemoInnerBoxContent/>
}

function DemoInner() {
  return <DemoInnerBox/>
}

export default function Demo() {
  const [title, setTitle] = useState('I am title !')
  const [colors, setColors] = useState({
    primary: 'red'
  })
  return (
    <ColorContext.Provider value={colors}>
    <TitleContext.Provider value={[title, setTitle]}>
    <div>
      <button onClick={() => {
        setColors({
          primary: 'blue'
        })
      }}>click me!</button>
      title: {title}
      <DemoInner/>
    </div>
    </TitleContext.Provider>
    </ColorContext.Provider>
  )
}
另外,Context.Provider 也是可以變換,舉例現在這樣改,最後顯示是綠色。原因是因為使用 context 會找最近的,離他最近的 context 是綠色的那個而不是上面紅色的那個。
所以 ThemeProvider 可以針對不同的 button 不同的 component 提供不同的 ThemeProvider 提供不同的 Theme,這樣就可以有不同的樣式。但通常只會有一個,讓整個 app 有相同的樣式。
// 將拿到的紅色改成綠色傳遞下去,,所以在 DemoInnerBoxContent 拿到的值就是綠色
function DemoInnerBox() {
  return(
    <ColorContext.Provider value={{primary: 'green'}}>
      <DemoInnerBoxContent/>
    </ColorContext.Provider>
  )
}
import React from 'react';
import {useState, useContext, createContext} from 'react'

const TitleContext = createContext() // 裡面傳的是 TitleContext 要提供 value 的初始值
const ColorContext = createContext()
function DemoInnerBoxContent() {
  const [title, setTitle] = useContext(TitleContext) // 我在這一層要用 context 傳進來的值

  const colors = useContext(ColorContext)
  return (
    <div>
      <button  style={{color: colors.primary}} onClick={() => {setTitle(Math.random())}}>
        update title!!
      </button>
      {title}
    </div>
  )
}

function DemoInnerBox() {
  return(
    <ColorContext.Provider value={{primary: 'green'}}>
      <DemoInnerBoxContent/>
    </ColorContext.Provider>
  )
}

function DemoInner() {
  return <DemoInnerBox/>
}

export default function Demo() {
  const [title, setTitle] = useState('I am title !')
  const [colors, setColors] = useState({
    primary: 'red'
  })
  return (
    <ColorContext.Provider value={colors}>
    <TitleContext.Provider value={[title, setTitle]}>
    <div>
      <button onClick={() => {
        setColors({
          primary: 'blue'
        })
      }}>click me!</button>
      title: {title}
      <DemoInner/>
    </div>
    </TitleContext.Provider>
    </ColorContext.Provider>
  )
}
實際應用:網站有登入功能,我會需要在其他 component 知道使用者有無登入,所以可能會在要否 render 編輯 button 知道使用者是否登入。使用者是否登入的狀態要存到最上層的 state,這樣才可以給下面的人使用。
對一個 app 底下有很多不同的 component 都需要使用相同的 state,這個時候如果多個 props ,就要每個都傳。但藉由 context 我只要在想要的地方用 useContext 就可以拿到我想拿到的值。

_邊框漸層色_@mijouhsieh_https://static.coderbridge.com/images/covers/default-post-cover-1.jpg)

_C# 顯示電腦時間_@jim892200_https://static.coderbridge.com/images/covers/default-post-cover-2.jpg)

_Airflow 動手玩:(六)Airflow with Kuberentes Executor_@FrankYang0529_https://static.coderbridge.com/images/covers/default-post-cover-3.jpg)
